Cross-sectional Models and Ducts
We've seen one way in which geometric modellers can represent simple curved surfaces like cylinders and spheres. But many engineering components have surfaces which curve in much more complicated ways than this. Think of the smooth fillet at a T junction in some pipework, for example.
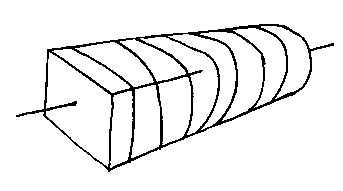
Ducts are a method of representing a large class of such shapes. Ducts are used for pipework, manifolds, bottles, pump impeller casings, and so on.
The idea behind them pre-dates computers: it is based on the laying out of a wooden ship's hull. To make a ship you put down the keel, then add vertical sections of the correct form, then finally nail planks of wood along the sides.
In computer-aided design and manufacture a similar principle can be used:
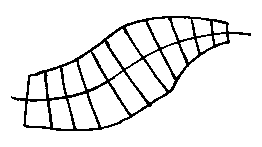
A sequence of profiles are attached to a spine. In this picture the spine is straight and the profiles gradually change from a rectangle to a circle.
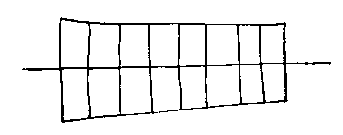
This is a plan view. Duct geometric models are quite old now, but there are many systems still in use, especially in casting and moulding industries. New geometric modellers tend not to use them, however, but use sculptured surfaces instead. There are also hybrid systems.
How is a duct specified and stored in the computer?
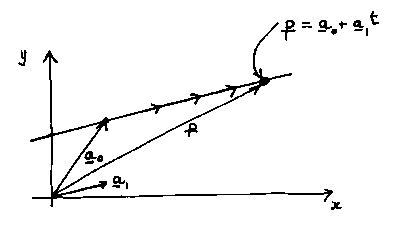
Remember the parametric equation of a straight line,

where p is any point (x, y) on the
line,  is the point on the
line where the parameter is 0,
is the point on the
line where the parameter is 0,  is the line's gradient vector, and
  is the parameter. As t increases the point p moves
along the line in the direction of the arrows.
is the parameter. As t increases the point p moves
along the line in the direction of the arrows.
We can use a parametric line to specify the spine of the duct.
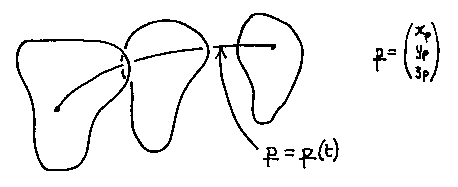
In general, we want the spine to be a curve in space, not a straight line in the plane, so:
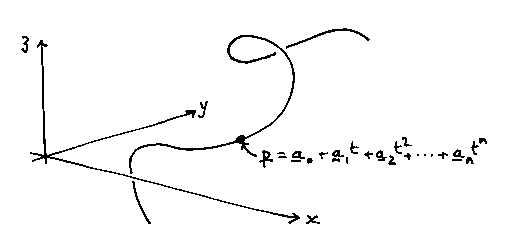
We make a parametric polynomial curve. Now p is a point in space, (x, y, z), and so the a vectors have to have three elements as well. We add terms in powers of t, and this builds a curve.
We can put profiles along our curve in space, to build up really quite complicated shapes.
There are some problems that we have to watch out for though:
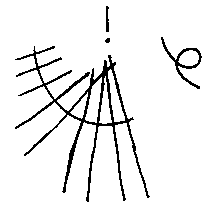
The degree of continuity of the curve must be at least one higher than the degree of continuity that we need at the duct's surface.
Continuity is specified as  ,
,
 and so on. A
curve (or surface) is like the
kinked spine in the picture above: it has continuity of position
(i.e. all the points along it join up), but not of gradient
(i.e. if you differentiated it, the derivative would be two chunks
separated by a gap). A curve
is visually smooth - its gradient changes gradually as you move
along it without any steps.
and so on. A
curve (or surface) is like the
kinked spine in the picture above: it has continuity of position
(i.e. all the points along it join up), but not of gradient
(i.e. if you differentiated it, the derivative would be two chunks
separated by a gap). A curve
is visually smooth - its gradient changes gradually as you move
along it without any steps.
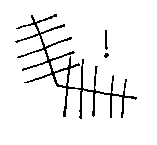
But even if we have a spine, there
may be problems. If the profiles are so big that they overlap at tight
corners in the spine, the outer surface of the duct will still be
continuous (i.e. it will have no steps in), but it may loop the loop.
This is obviously a nonsense shape from an engineering point of view,
even if it is algebraically sensible. The best way to avoid
this sort of problem is to plot out the duct on the computer before
attempting to make it in real aluminium, perspex, or whatever.
We have a curve p specified as a function of a parameter t. As t changes, we move along the curve. How are the profiles specified?
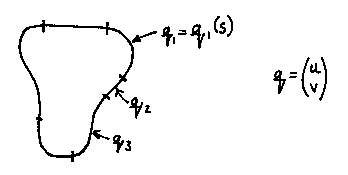
We make a two-dimensional lamina shape out of two-dimensional parametric curves, q. The parameter for these is s to avoid confusion with the spine parameter t. We obviously can't use x and y as the two dimensions for these flat lamina shapes, as the space in which the whole duct is being built is x, y, z. So we use u and v.
How can we fill in the gaps between one profile and the next? One way is to create a ruled surface.
Consider two profile curves
 and
and  on adjacent profiles along the spine. We want to patch a surface
between them. Suppose, for simplicity, that t is 0 at the
profile , and 1 at the profile
, and that s runs from
0 to 1 along each profile curve.
on adjacent profiles along the spine. We want to patch a surface
between them. Suppose, for simplicity, that t is 0 at the
profile , and 1 at the profile
, and that s runs from
0 to 1 along each profile curve.
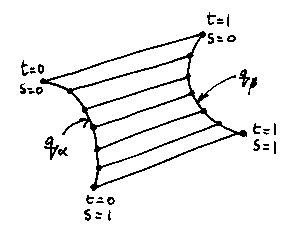
Our surface will be:

Where r is a point (x, y, z) in the surface, and is a function of the two parameters, s and t.
What we've effectively done is to scrape a ruler along the two curves, filling the gap between them with the surface the ruler sweeps. s says how far we've scraped the ruler, t measures along the ruler. We've created a surface like a piece of distorted graph paper; the axes are s and t, and any point in the surface is given by the three-dimensional vector r, which is a function of s and t.
The effect of these ruled surfaces on the duct is (in plan view) this...
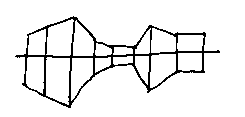
...which is fine for simple objects. But we'd obviously like to have smooth surfaces for many applications. We can change our function r to add higher powers of s and t to make it smother. This brings us on to the next chapter...
© Adrian Bowyer 1996