

Next: Method for Occlusions Breaking
Up: Occlusion Recovery
Previous: Occlusion Recovery
Identifying Allowed Reconstructions
We rely on distance transforms [6].
This method
finds perimeter points that are actually facing the connecting area.
Then we draw lines between the pixels facing each other with
the Bresenham algorithm, as in [1].
The method relies on distance
transforms, which encode the distance (in pixels) to the nearest region
point.
Figure 7 (center) shows the distance transform of
one of the matching areas in figure 7 (left). Figure
7 (right)
shows the potentially reconstructible area between
the two surfaces shown in figure 7 (left).
The distance transforms records the distance to the nearest boundary
point allowing an easy computation of the hypothesised occluded
surface.

Figure 7: Matching areas. These belong to the same wall lying behind the
chair. Areas are gray, perimeter points are shown in black
(left). The distance transform for one of the areas shown in the
left figure. Perimeter points have been added for clarity. (right) The
potentially reconstructible area between the two surfaces shown in
the left figure.
Surface Reconstruction
Reconstruction takes place between regions belonging to the same group
and satisfying the depth constraint. Given an occluding pixel and an
occluded surface, a simple and intuitive way to perform reconstruction
is to intersect the ray from the sensor through the occluding point with
the occluded surface. As this ray overlaps the optical ray of the
laser scanning beam, the reconstructed pixel is placed in a position
that could actually have been sensed by the sensor.
For planes there is usually one intersection. For cylinders and spheres we
usually find two intersections. If the shape of the
surface is concave, the most
distant intersection is chosen. Similarly on convex surfaces the
closer intersection is chosen.
Due to noise, surfaces extrapolated into the possibly occluded area
never perfectly match each other. Consequently, the surfaces are
interpolated. A solution is a weighted averaging between all the
intersections with the extrapolated surfaces, with weights depending on
the distances from the intersection to the closest perimeter point of
each surface. The position of the reconstructed pixel can be computed by:


The summation in equation (1) takes place over all the surfaces
involved in the reconstruction.
Because points that are closer to a certain surface would be weighted
more than points that are further away, the weighting function should
be decreasing with the input distance. The weighting function used for
the example is shown in equation (2).
Reconstruction Validation
The choice now becomes whether to reconstruct or not. Reconstruction
is a severe change to the image, so it is important to be very careful
in applying it.
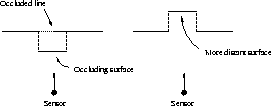
If the area between two matching surfaces is further away from the
sensor than the area of the surface to be reconstructed, then
reconstruction should not happen (see figure 8).
This happens on many occasions
when niches as door or windows are involved.
In cases of
Occlusions Preserving Surfaces and Occlusions Breaking Surfaces, a
proposed solution is to first reconstruct the surface and then compare
reconstructed and measured points. Reconstruction is allowed only if
reconstructed points lie behind the measured ones.
All the pixels in the area between the surfaces are considered.
To achieve a more reliable result
each pixel vote for reconstruction, and only if enough pixels votes
for a reconstruction will it be applied.
As any reconstruction requires hypothesising non-observable data,
the assumptions lead to a conservative reconstruction having a high
likelihood of being correct.

Figure 8: A real occlusion and a niche
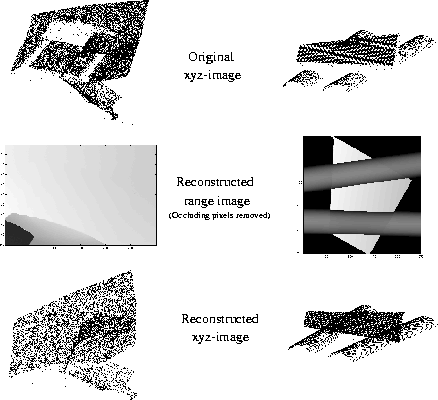
Figure 4.1 shows some reconstructed images. The left
image shows the occlusion caused by a chair in front of a wall. The
right image is an image acquired by an orthographic scanner.
The middle row shows a range image with reconstructed pixels and the
bottom row shows the reconstruction in 3D.
Because the reconstructed surface appeared unnaturally smooth, the same amount of Gaussian noise in the z-direction as
found in the original surfaces was added.

Figure 9: Results for an occluded wall (left) and two occluded
cylinders (right)
Texture Reconstruction
Although reconstructing the occluded surfaces makes the 3D models
more realistic (no more chair-shaped holes as in the figure), they still
lack intensity texture.
The reconstructed surfaces are merely points in 3D space without any
information about the light intensity or colour at that point.
So, we hypothesise what the intensity on the surface
would have been if it was possible to directly sense the surface.
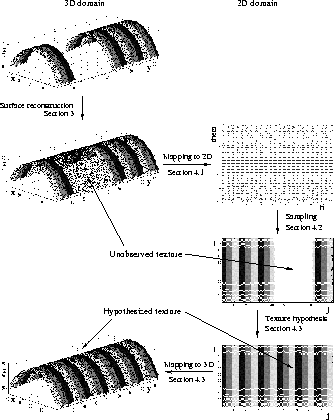
The main idea is illustrated in diagram of figure 10
The reconstructed points and the neighbouring measured ones are
mapped onto a planar texture space. This step allows easier
and more efficient processing than the unordered points in 3D
space. For 3D scene planes, this is a simple translation and rotation.
For cylinders we use a h- surface parametrization, and for
spheres a
  -
- parametrization.
An acquired intensity image is mapped on the same
plane according to number and position of the mapped surface points
and then propogated by a variety of methods.
The reconstructed 3D points then acquire a hypothesized intensity from
the corresponding point in the surface texture space.

Figure 10: Texture reconstruction


Next: Method for Occlusions Breaking
Up: Occlusion Recovery
Previous: Occlusion Recovery
Bob Fisher
Thu Jan 17 16:45:14 GMT 2002


