Thinning is a morphological operation that is used to remove selected foreground pixels from binary images, somewhat like erosion or opening. It can be used for several applications, but is particularly useful for skeletonization. In this mode it is commonly used to tidy up the output of edge detectors by reducing all lines to single pixel thickness. Thinning is normally only applied to binary images, and produces another binary image as output.
The thinning operation is related to the hit-and-miss transform, and so it is helpful to have an understanding of that operator before reading on.
Like other morphological operators, the behavior of the thinning operation is determined by a structuring element. The binary structuring elements used for thinning are of the extended type described under the hit-and-miss transform (i.e. they can contain both ones and zeros).
The thinning operation is related to the hit-and-miss transform and can be expressed quite simply in terms of it. The thinning of an image I by a structuring element J is:
where the subtraction is a logical subtraction defined by
 .
.
In everyday terms, the thinning operation is calculated by translating the origin of the structuring element to each possible pixel position in the image, and at each such position comparing it with the underlying image pixels. If the foreground and background pixels in the structuring element exactly match foreground and background pixels in the image, then the image pixel underneath the origin of the structuring element is set to background (zero). Otherwise it is left unchanged. Note that the structuring element must always have a one or a blank at its origin if it is to have any effect.
The choice of structuring element determines under what situations a foreground pixel will be set to background, and hence it determines the application for the thinning operation.
We have described the effects of a single pass of a thinning operation
over the image. In fact, the operator is normally applied repeatedly
until it causes no further changes to the image (i.e. until
convergence). Alternatively, in some applications, e.g.
pruning, the operations may only be applied for a limited number
of iterations.
Thinning is the dual of thickening, i.e. thickening the foreground is equivalent to thinning the background.
One of the most common uses of thinning is to reduce the thresholded output of an edge detector such as the Sobel operator, to lines of a single pixel thickness, while preserving the full length of those lines (i.e. pixels at the extreme ends of lines should not be affected). A simple algorithm for doing this is the following:
Consider all pixels on the boundaries of foreground regions (i.e. foreground points that have at least one background neighbor). Delete any such point that has more than one foreground neighbor, as long as doing so does not locally disconnect (i.e. split into two) the region containing that pixel. Iterate until convergence.
This procedure erodes away the boundaries of foreground objects as much as possible, but does not affect pixels at the ends of lines.
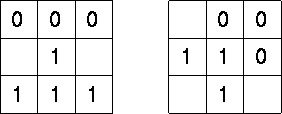
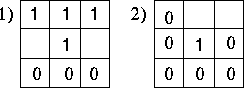
This effect can be achieved using morphological thinning by iterating until convergence with the structuring elements shown in Figure 1, and all their 90° rotations (4×2 = 8 structuring elements in total).
In fact what we are doing here is determining the octagonal skeleton of a binary shape --- the set of points that lie at the centers of octagons that fit entirely inside the shape, and which touch the boundary of the shape at at least two points. See the section on skeletonization for more details on skeletons and on other ways of computing it. Note that this skeletonization method is guaranteed to produce a connected skeleton.
Figure 1 Structuring elements for skeletonization by morphological thinning. At each iteration, the image is first thinned by the left hand structuring element, and then by the right hand one, and then with the remaining six 90° rotations of the two elements. The process is repeated in cyclic fashion until none of the thinnings produces any further change. As usual, the origin of the structuring element is at the center.
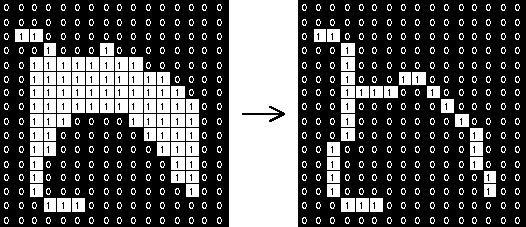
Figure 2 shows the result of this thinning operation on a simple binary image.
Figure 2 Example skeletonization by morphological thinning of a simple binary shape, using the above structuring elements. Note that the resulting skeleton is connected.
Note that skeletons produced by this method often contain undesirable short spurs produced by small irregularities in the boundary of the original object. These spurs can be removed by a process called pruning, which is in fact just another sort of thinning. The structuring element for this operation is shown in Figure 3, along with some other common structuring elements.
Figure 3 Some applications of thinning. 1 simply finds the boundary of a binary object, i.e. it deletes any foreground points that don't have at least one neighboring background point. Note that the detected boundary is 4-connected. 2 does the same thing but produces an 8-connected boundary. 3a and 3b are used for pruning. At each thinning iteration, each element must be used in each of its four 90° rotations. Pruning is normally carried out for only a limited number of iterations to remove short spurs, since pruning until convergence will actually remove all pixels except those that form closed loops.
Note that many implementations of thinning have a particular structuring element `hardwired' into them (usually the skeletonization structuring elements), and so the user does not need to be concerned about selecting one.
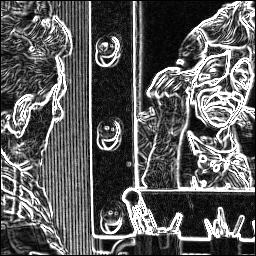
The image
is the result of applying the Sobel operator to
Note that the detected boundaries of the object are several pixels thick.
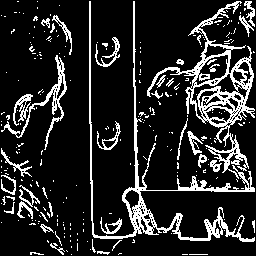
We first threshold the image at a graylevel value of 60 producing
in order to obtain a binary image.
Then, iterating the thinning algorithm until convergence, we get
The detected lines have all been reduced to a single pixel width. Note however that there are still one or two `spurs' present, which can be removed using pruning.
The image
is the result of pruning (using thinning) for five iterations. The spurs are now almost entirely gone.
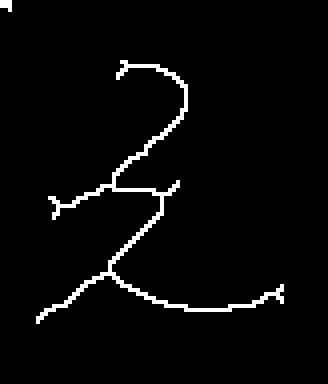
Thinning is often used in combination with other morphological operators tp extract a simple representation of regions. A common example is the automated recognition of hand-written characters. In this case, morphological operators are used as pre-processing to obtain the shapes of the characters which then can be used for the recognition. We illustrate a simple example using
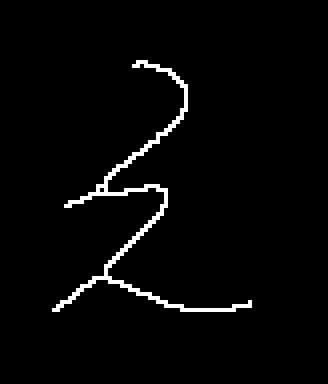
which shows a Japanese character. Note that this and the following images were zoomed by a factor of 4 for a better display. Hence, a 4×4 pixel square here corresponds to 1 pixel during the processing. Since we want to work on binary images, we start off by thresholding the image at a value of 180, obtaining
A simple way to obtain the skeleton of the character is to thin the image with the structuring elements shown in Figure 4 until convergence. The result is shown in
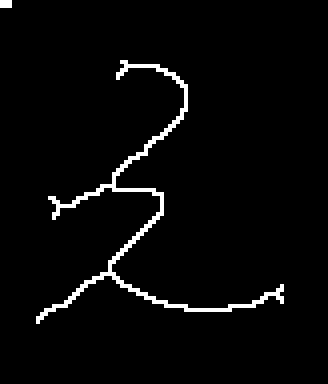
The character is now reduced to a single pixel-wide line. However, the line is broken at some locations, which might cause problems during the recognition process. To improve the situation we can first dilate the image to connect the lines before thinning it. Dilating the image twice with a 3×3 square structuring element yields
then the result of the thinning is
The corresponding images for three dilations are
and
Although the line is now connected the process also had negative effects on the skeleton: we obtain spurs on the end points of the lines and the skeleton changes its shape at high curvature locations. We try to prune the spurs by thinning the image using the structuring elements shown in Figure 4.
Figure 4 Shows the structuring elements used in the character recognition example. 1 shows the structuring element used in combination with thinning to obtain the skeleton. 2 was used in combination with thinning to prune the skeleton and with the hit-and-miss operator to find the end points of the skeleton. Each structuring element was used in each of its 45° rotations.
Pruning the image which was obtained after 2 dilations and thinning yields
, using two iterations for each orientation of the structuring element. For the example obtained after 3 dilations we get
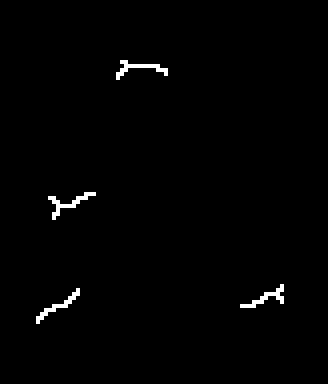
using 4 iterations of pruning. The spurs have now disappeared, however, the pruning has also suppressed pixels at the end of correct lines. If we want to restore these parts of the image, we can combine the dilation operator with a logical AND operator. First, we need to know the end points of the skeleton so that we know where to start the dilation. We find these by applying a hit-and-miss operator using the structuring element shown in Figure 4. The end points of the latter of the two pruned, images are shown in
Now, we dilate
this image using a 3×3 structuring element. ANDing it with the thinned,
but not pruned image prevents the dilation from spreading out in all
direction, hence it limits the dilation along the original
character. This process is known as conditional dilation. After
repeating this procedure 5 times, we obtain
Although one of the parasitic branches has disappeared, the ones appearing close to the end of the lines remain.
Our final step is to OR this image with the pruning output thus obtaining
This simple example illustrates that we can successfully apply a variety of morphological operators to obtain information about the shape of a character. However, in a real world application, more sophisticated algorithms and structuring elements would be necessary to get good results.
Thinning more complicated images often produces less spectacular results.
For instance
is the output from the Sobel operator applied to
The image
is the same image thresholded at a graylevel value of 200.
And
is the effect of skeletonization by thinning. The result is a lot less clear than before. Compare this with the results obtained using the Canny operator.
You can interactively experiment with this operator by clicking here.
using morphological edge detection. First threshold the image, then apply thinning using the structuring element shown in Figure 3. Compare the result with
which was obtain using the Sobel operator and morphological post-processing (see above).
R. Gonzalez and R. Woods Digital Image Processing, Addison-Wesley Publishing Company, 1992, pp 518 - 548.
E. Davies Machine Vision: Theory, Algorithms and Practicalities, Academic Press, 1990, pp 149 - 161.
R. Haralick and L. Shapiro Computer and Robot Vision, Vol 1, Addison-Wesley Publishing Company, 1992, Chap. 5, pp 168 - 173.
A. Jain Fundamentals of Digital Image Processing, Prentice-Hall, 1989, Chap. 9.
D. Vernon Machine Vision, Prentice-Hall, 1991, Chap. 4.
Specific information about this operator may be found here.
More general advice about the local HIPR installation is available in the Local Information introductory section.
©2003 R. Fisher, S. Perkins,
A. Walker and E. Wolfart.
![]()